> ## Documentation Index
> Fetch the complete documentation index at: https://docs.pulseairtest.com/llms.txt
> Use this file to discover all available pages before exploring further.
# Running a test
To start a new Pulse test, click the *Run Test* button from the *Home* screen. You will be guided through a number of screens to collect information about the test.
## Property screen
The *Property* screen allows you to enter an address of where the test is being performed. This is essential for finding the test again in the future as well as for reporting and auditing purposes.
There a number of ways in which to enter an address: using address lookup, manual entering it or copying an address from a previous test.
### Address lookup (UK only)
To find an address quickly, use the *Address Lookup* option and enter the postcode or house number + postcode.
A list of matching addresses will be returned and you can select the correct address from the list displayed.
For best results, format the postcode correctly including a space, e.g. "AB1 2CD".
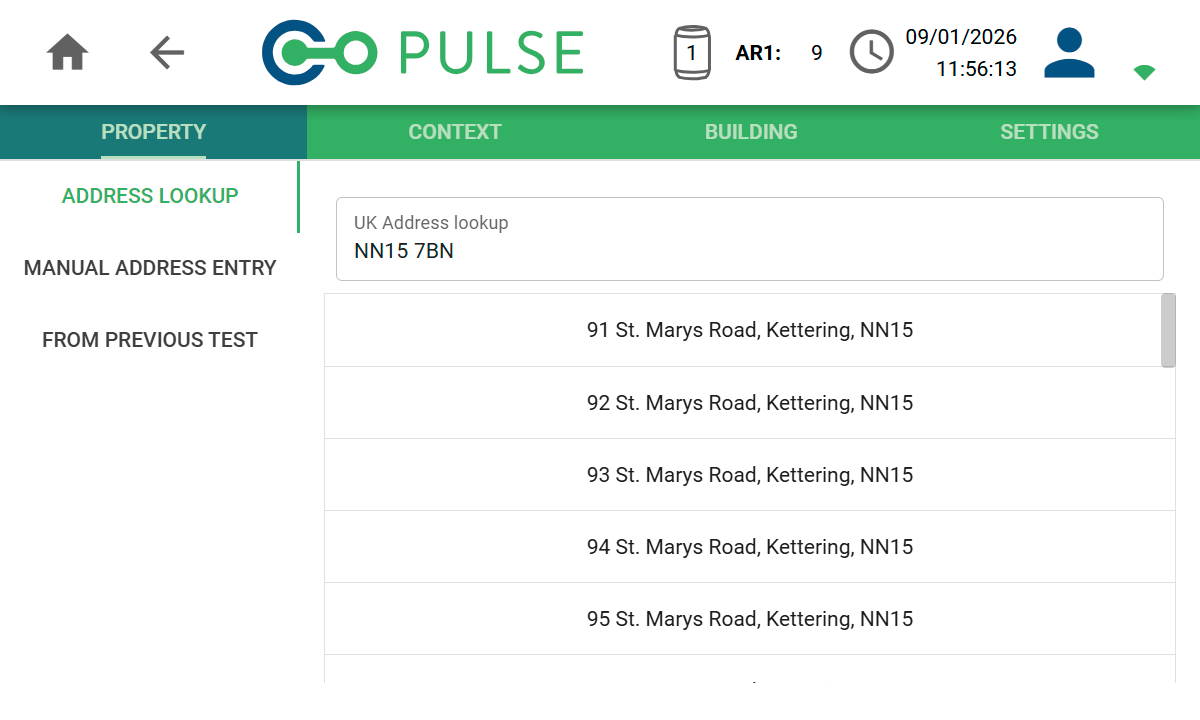 You must be connected to Wi-Fi in order to use the address lookup functionality.
The address lookup functionality makes use of Royal Mail's Postcode Address File (PAF®) including the "Not Yet Built" dataset.
This is a comprehensive database of all addresses in the UK, Channel Islands and Isle of Man, and includes dwellings still under construction.
### Manual address entry
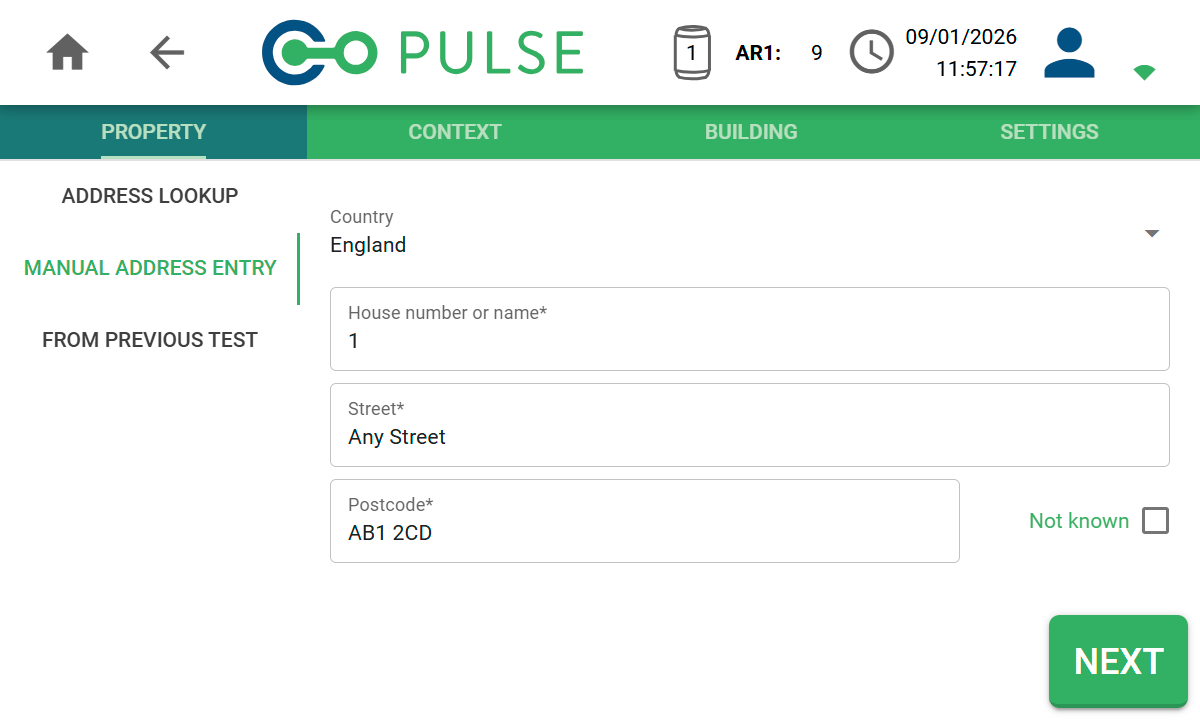
If you cannot find the address using the lookup functionality, or you are entering a non-UK address, you can use the *Manual Address Entry* screen to enter the location of the property.
To proceed, select the country from the dropdown list, enter the first line of the address and postcode (where known).
You must be connected to Wi-Fi in order to use the address lookup functionality.
The address lookup functionality makes use of Royal Mail's Postcode Address File (PAF®) including the "Not Yet Built" dataset.
This is a comprehensive database of all addresses in the UK, Channel Islands and Isle of Man, and includes dwellings still under construction.
### Manual address entry
If you cannot find the address using the lookup functionality, or you are entering a non-UK address, you can use the *Manual Address Entry* screen to enter the location of the property.
To proceed, select the country from the dropdown list, enter the first line of the address and postcode (where known).
 ### Use an address from a previous test
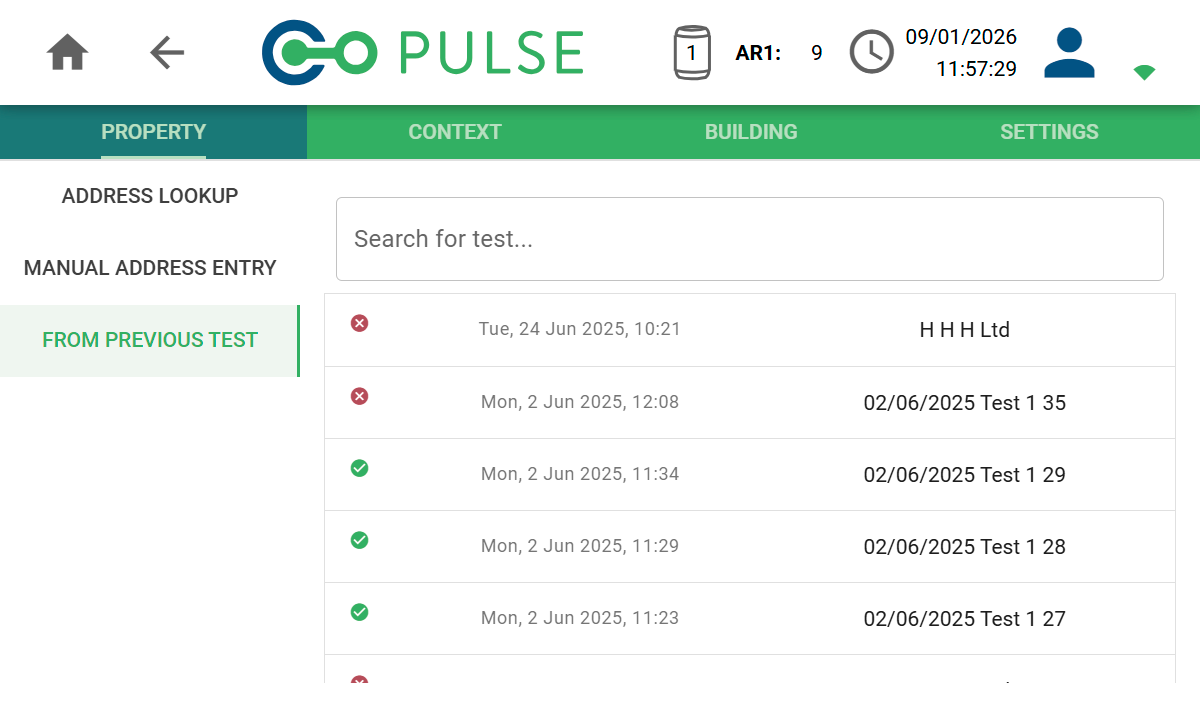
For a property that has been tested by you before, or for similar properties on the same street, it is possible to copy an address and settings from a previous test.
Go to the *From Previous Test* screen and search for the previous test.
### Use an address from a previous test
For a property that has been tested by you before, or for similar properties on the same street, it is possible to copy an address and settings from a previous test.
Go to the *From Previous Test* screen and search for the previous test.
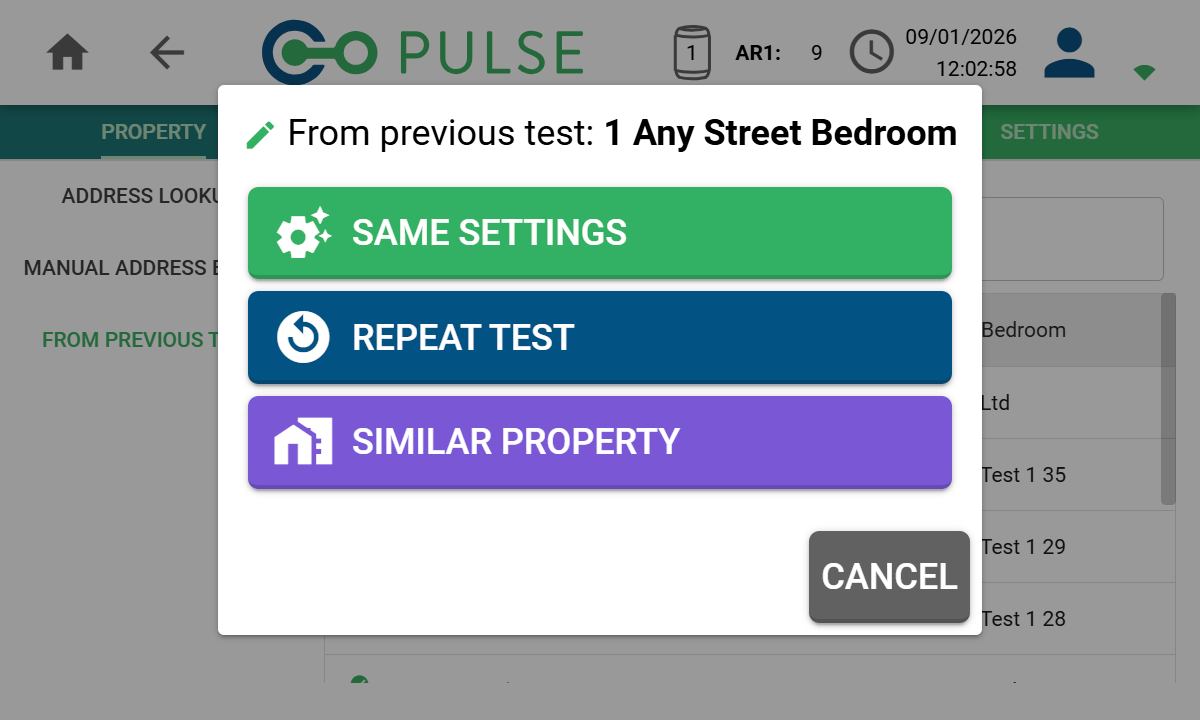
 Once the previous test has been found, select one of the options to proceed:
To do another test within the same property but following a different procedure or in another room, select the *Same Settings* option.
When you need to run another identical test within the same property, select the *Repeat Test* option.
If you are testing in a similar property to one you have tested previously, select the *Similar Property* option where you will be prompted to enter a new address.
Once the previous test has been found, select one of the options to proceed:
To do another test within the same property but following a different procedure or in another room, select the *Same Settings* option.
When you need to run another identical test within the same property, select the *Repeat Test* option.
If you are testing in a similar property to one you have tested previously, select the *Similar Property* option where you will be prompted to enter a new address.
 ## Context screen
The *Context* screen enables you to add contextual information about the test being performed, this determines which of the proceeding input fields are mandatory. It is also useful for future reference and streamlines the process of creating online test reports.
### Test type
On the *Context* screen, you are required to specify the type of air test being performed - either Air Pressure Test or Background Ventilation Assessment.
Refer to test types for more information on each type of test.
### Test enclosure
You are also required to state the type of enclosure being tested. If you are testing an entire building or part of a building, select *Whole Building* and enter the dimensions/volume of the entire building or space being tested.
## Context screen
The *Context* screen enables you to add contextual information about the test being performed, this determines which of the proceeding input fields are mandatory. It is also useful for future reference and streamlines the process of creating online test reports.
### Test type
On the *Context* screen, you are required to specify the type of air test being performed - either Air Pressure Test or Background Ventilation Assessment.
Refer to test types for more information on each type of test.
### Test enclosure
You are also required to state the type of enclosure being tested. If you are testing an entire building or part of a building, select *Whole Building* and enter the dimensions/volume of the entire building or space being tested.
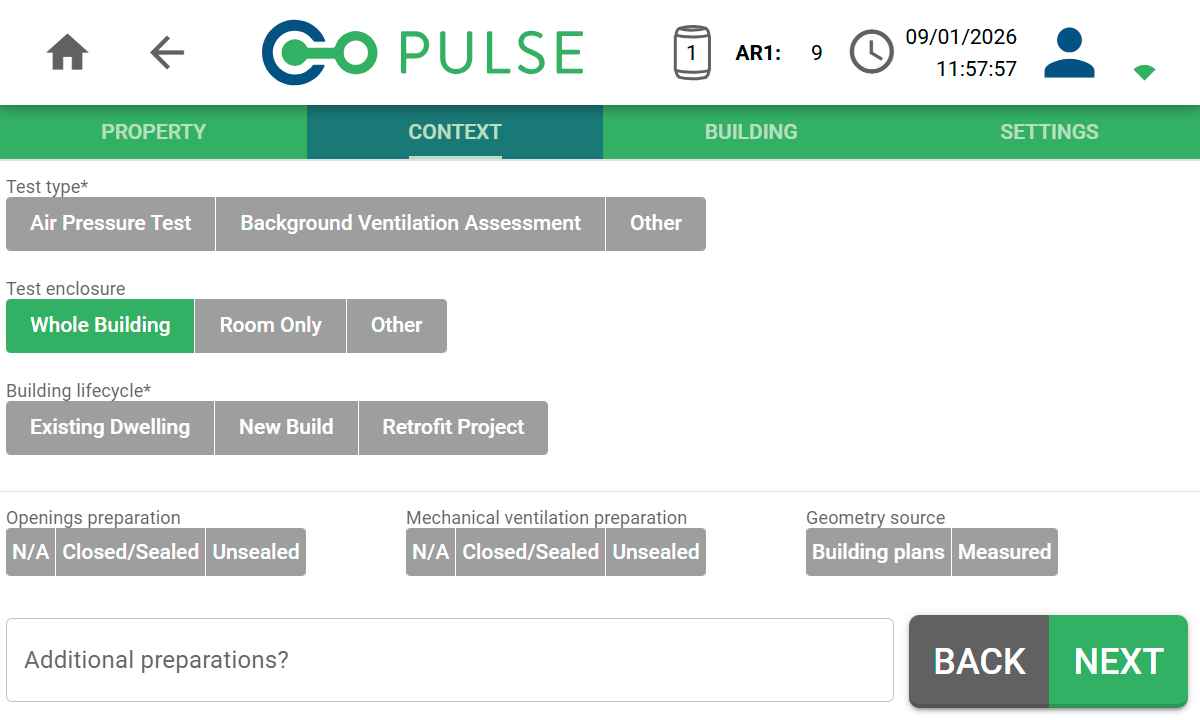 If you are testing only a single room within the building (common for Background Ventilation Assessment), select *Room Only*. This will enable the Room screen to appear where you can enter specifics of the room in question.
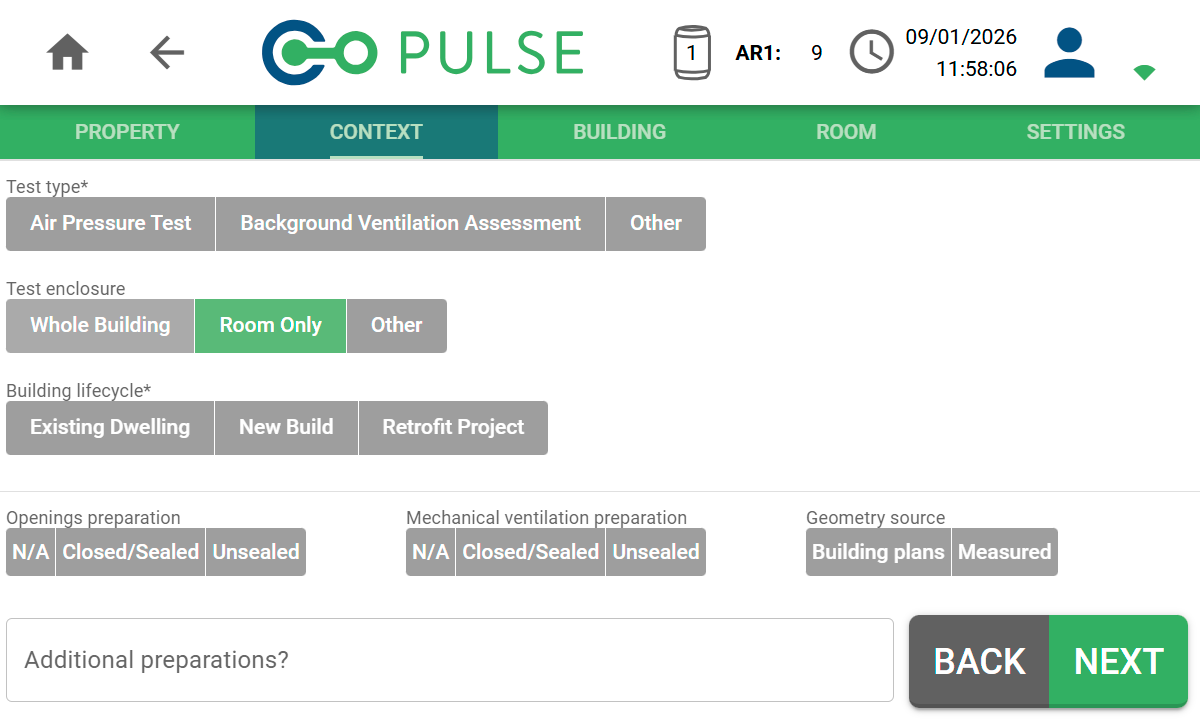 When testing any other type of enclosure, select *Other* and enter the correct dimensions/volume on the Building screen.
### Test preparation
There are also a number of input fields around the preparation you performed in the building before carrying out the Pulse test.
These are optional questions that allow you to record information required for CIBSE TM23 reporting and similar.
## Building screen
The building screen allows you to enter information about the building and its architecture. When doing a whole building test, the building name (main, extension etc) as well as the dimensions/volume are required inputs.
When testing any other type of enclosure, select *Other* and enter the correct dimensions/volume on the Building screen.
### Test preparation
There are also a number of input fields around the preparation you performed in the building before carrying out the Pulse test.
These are optional questions that allow you to record information required for CIBSE TM23 reporting and similar.
## Building screen
The building screen allows you to enter information about the building and its architecture. When doing a whole building test, the building name (main, extension etc) as well as the dimensions/volume are required inputs.
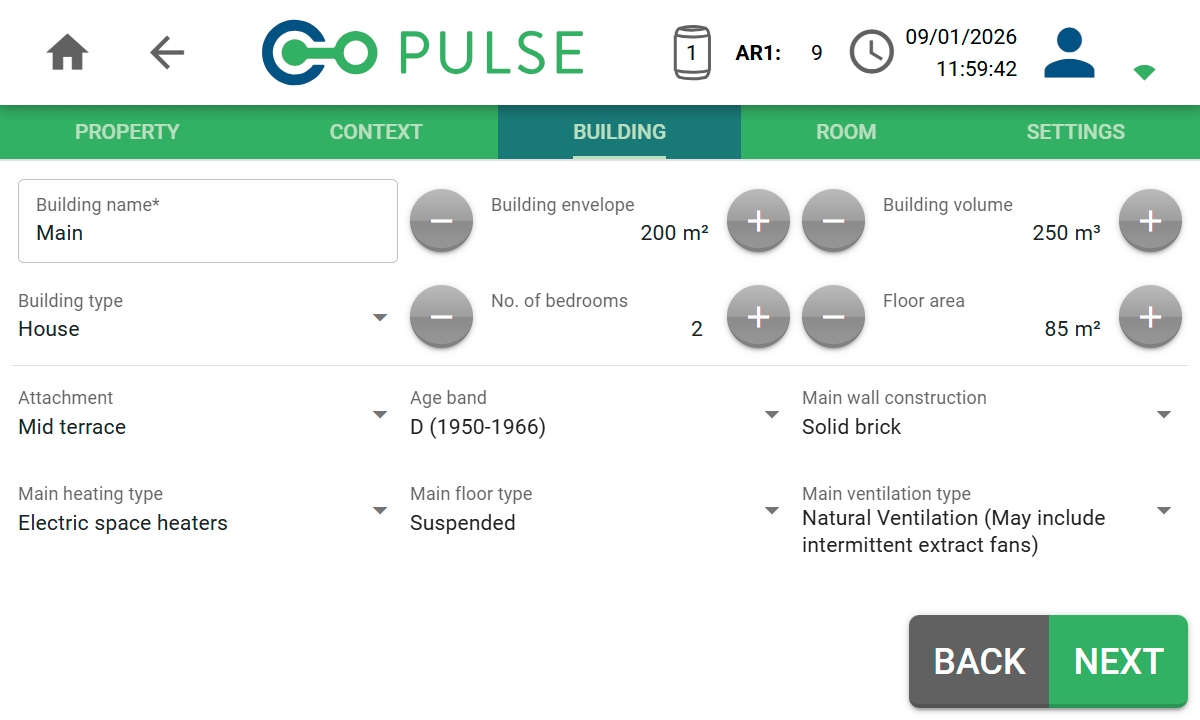 For *Air Pressure Tests*, both the envelope area and volume are mandatory, whereas for *Background Ventilation Tests*, only the volume is mandatory.
Refer to measuring volume and measuring envelope area for more information on how to determine the building geometry.
Optionally, enter additional information about the building:
* House
* Flat
* Bungalow
* Maisonette
* Park Home
* Commercial Premise
* Ground Floor
* Mid Floor
* Top Floor
* Detached
* Semi-Detached
* Mid-Terrace
* End-Terrace
* Enclosed Mid-Terrace (flats only)
* Enclosed End-Terrace (flats only)
For UK properties, the age bands will be based on the SAP region where the building is located.
For non-UK properties, the age bands will be based on decades:
* before 1910
* 1910-1919
* 1920-1929
* 1930-1939
* 1940-1949
* 1950-1959
* 1960-1969
* 1970-1979
* 1980-1989
* 1990-1999
* 2000-2009
* 2010-2019
* 2020 onwards
* Cavity
* Cob
* Solid Brick
* Solid Concrete
* Solid Stone
* Steel Frame
* System Build
* Timber Frame
* Other
* Solid
* Suspended (timber or concrete beam & block)
* Boiler
* Communal Heat Network (serving one building)
* District Heat Network (serving multiple buildings)
* Electric Space Heaters
* Heat Pump
* Heating Stove
* Warm Air Heating
* Other
* Natural Ventilation (may include intermittent extract fans)
* Centralised Mechanical Extract Only (MEV)
* Decentralised Mechanical Extract Only (dMEV)
* Mechanical Ventilation (MV)
* Mechanical Ventilation with Heat Recovery (MVHR)
* Positive Input Ventilation (PIV)
## Room screen (room tests only)
When doing a room only test, the room screen allows you to enter information about the room being tested its dimensions/volume.
For *Air Pressure Tests*, both the envelope area and volume are mandatory, whereas for *Background Ventilation Tests*, only the volume is mandatory.
Refer to measuring volume and measuring envelope area for more information on how to determine the building geometry.
Optionally, enter additional information about the building:
* House
* Flat
* Bungalow
* Maisonette
* Park Home
* Commercial Premise
* Ground Floor
* Mid Floor
* Top Floor
* Detached
* Semi-Detached
* Mid-Terrace
* End-Terrace
* Enclosed Mid-Terrace (flats only)
* Enclosed End-Terrace (flats only)
For UK properties, the age bands will be based on the SAP region where the building is located.
For non-UK properties, the age bands will be based on decades:
* before 1910
* 1910-1919
* 1920-1929
* 1930-1939
* 1940-1949
* 1950-1959
* 1960-1969
* 1970-1979
* 1980-1989
* 1990-1999
* 2000-2009
* 2010-2019
* 2020 onwards
* Cavity
* Cob
* Solid Brick
* Solid Concrete
* Solid Stone
* Steel Frame
* System Build
* Timber Frame
* Other
* Solid
* Suspended (timber or concrete beam & block)
* Boiler
* Communal Heat Network (serving one building)
* District Heat Network (serving multiple buildings)
* Electric Space Heaters
* Heat Pump
* Heating Stove
* Warm Air Heating
* Other
* Natural Ventilation (may include intermittent extract fans)
* Centralised Mechanical Extract Only (MEV)
* Decentralised Mechanical Extract Only (dMEV)
* Mechanical Ventilation (MV)
* Mechanical Ventilation with Heat Recovery (MVHR)
* Positive Input Ventilation (PIV)
## Room screen (room tests only)
When doing a room only test, the room screen allows you to enter information about the room being tested its dimensions/volume.
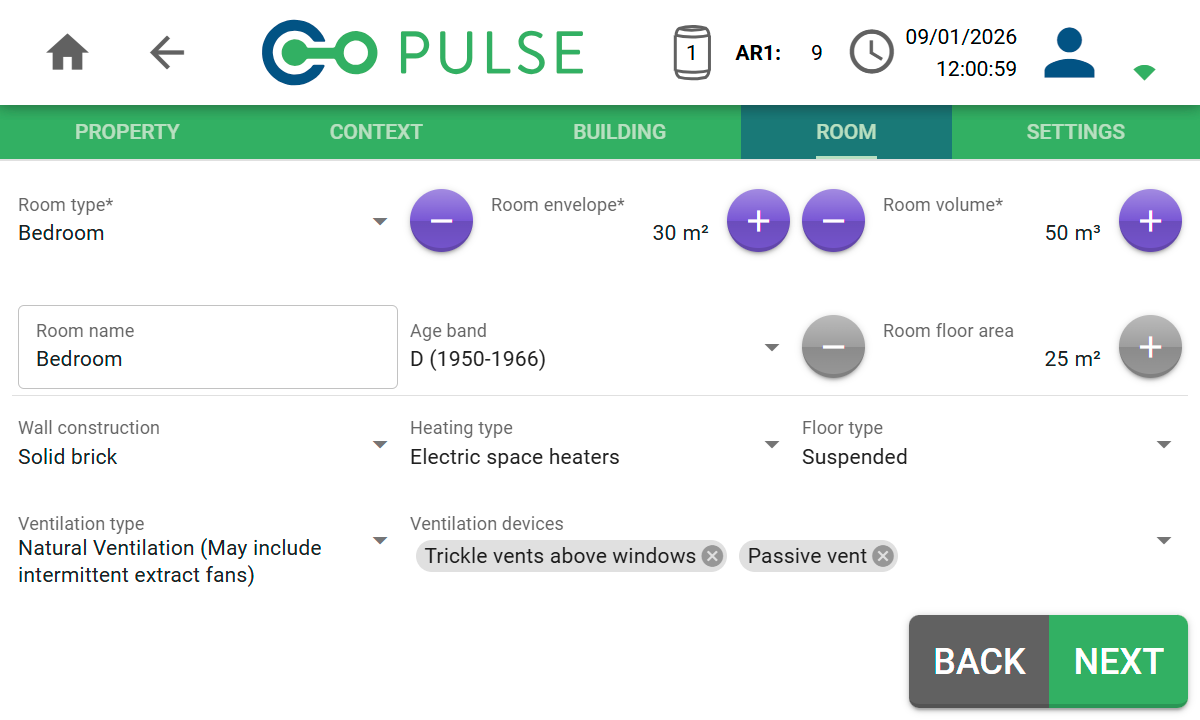 For *Air Pressure Tests*, both the envelope area and volume are mandatory, whereas for *Background Ventilation Tests*, only the volume is mandatory.
Refer to measuring volume and measuring envelope area for more information on how to determine the room geometry.
Optionally, enter additional information about the room:
* Basement
* Bathroom
* Bedroom
* Corridor
* Dining Room
* Kitchen
* Landing
* Living Room
* Lounge
* Office
* Store Room
* Study
* Toilet
* Utility Room
* Other
Will default to *Room type* but can be overridden, e.g. "Bedroom 1" or "Meeting Room" etc.
For UK properties, the age bands will be based on the SAP region where the building is located.
For non-UK properties, the age bands will be based on decades:
* before 1910
* 1910-1919
* 1920-1929
* 1930-1939
* 1940-1949
* 1950-1959
* 1960-1969
* 1970-1979
* 1980-1989
* 1990-1999
* 2000-2009
* 2010-2019
* 2020 onwards
* Cavity
* Cob
* Solid Brick
* Solid Concrete
* Solid Stone
* Steel Frame
* System Build
* Timber Frame
* Other
* Solid
* Suspended (timber or concrete beam & block)
* Boiler
* Communal Heat Network (serving one building)
* District Heat Network (serving multiple buildings)
* Electric Space Heaters
* Heat Pump
* Heating Stove
* Warm Air Heating
* Other
* Natural Ventilation (may include intermittent extract fans)
* Centralised Mechanical Extract Only (MEV)
* Decentralised Mechanical Extract Only (dMEV)
* Mechanical Ventilation (MV)
* Mechanical Ventilation with Heat Recovery (MVHR)
* Positive Input Ventilation (PIV)
* Chimney
* Closed combustion flue (e.g. wood burner)
* Cooker hood (vented to outside only)
* Intermittent extract fan
* Passive vent
* Trickle vents above windows
## Settings screen
The *Settings* screen allows you to enter your own test reference. This will default to the house number and postcode entered, but can be manually changed.
Additionally, you can also add notes about this specific test as well as general site notes about the building or location being tested.
For *Air Pressure Tests*, both the envelope area and volume are mandatory, whereas for *Background Ventilation Tests*, only the volume is mandatory.
Refer to measuring volume and measuring envelope area for more information on how to determine the room geometry.
Optionally, enter additional information about the room:
* Basement
* Bathroom
* Bedroom
* Corridor
* Dining Room
* Kitchen
* Landing
* Living Room
* Lounge
* Office
* Store Room
* Study
* Toilet
* Utility Room
* Other
Will default to *Room type* but can be overridden, e.g. "Bedroom 1" or "Meeting Room" etc.
For UK properties, the age bands will be based on the SAP region where the building is located.
For non-UK properties, the age bands will be based on decades:
* before 1910
* 1910-1919
* 1920-1929
* 1930-1939
* 1940-1949
* 1950-1959
* 1960-1969
* 1970-1979
* 1980-1989
* 1990-1999
* 2000-2009
* 2010-2019
* 2020 onwards
* Cavity
* Cob
* Solid Brick
* Solid Concrete
* Solid Stone
* Steel Frame
* System Build
* Timber Frame
* Other
* Solid
* Suspended (timber or concrete beam & block)
* Boiler
* Communal Heat Network (serving one building)
* District Heat Network (serving multiple buildings)
* Electric Space Heaters
* Heat Pump
* Heating Stove
* Warm Air Heating
* Other
* Natural Ventilation (may include intermittent extract fans)
* Centralised Mechanical Extract Only (MEV)
* Decentralised Mechanical Extract Only (dMEV)
* Mechanical Ventilation (MV)
* Mechanical Ventilation with Heat Recovery (MVHR)
* Positive Input Ventilation (PIV)
* Chimney
* Closed combustion flue (e.g. wood burner)
* Cooker hood (vented to outside only)
* Intermittent extract fan
* Passive vent
* Trickle vents above windows
## Settings screen
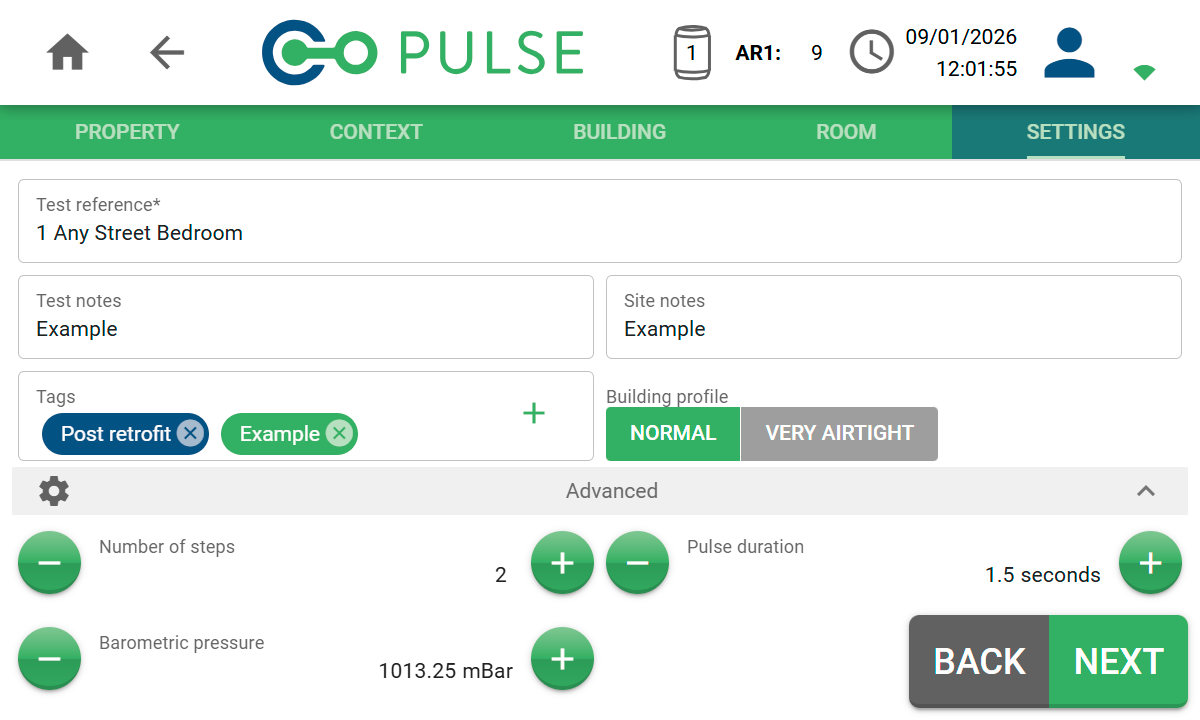
The *Settings* screen allows you to enter your own test reference. This will default to the house number and postcode entered, but can be manually changed.
Additionally, you can also add notes about this specific test as well as general site notes about the building or location being tested.
 ### Tags
Tags are a useful way of categorising tests, for instance, if you are doing multiple tests within the same building over time.
Pre-defined tags exist for *Pre-retrofit* and *Post-retrofit*. Custom tags can be added by clicking the + icon.
### Building profile
The building profile determines the test cycle used during the release of air. In most cases, this should be set to *Normal* which will trigger a 2-step, 1.5 second burst of air for each step.
For buildings that have been purposely built to a very airtight standard, such as Passivhaus, this can be set to *Very Airtight*. This will trigger a 3-second burst of air for both steps.
### Advanced settings
For advanced use cases, it is possible to override the number of steps and Pulse duration manually, as well as change the barometric pressure reading.
Overriding the default advanced settings can cause unexpected results. This section is designed for expert users only.
## Run test screen
The final stage is to launch the Pulse test. Clicking the *Next* button on the *Settings* screen will take you to the *Run test* screen.
### Tags
Tags are a useful way of categorising tests, for instance, if you are doing multiple tests within the same building over time.
Pre-defined tags exist for *Pre-retrofit* and *Post-retrofit*. Custom tags can be added by clicking the + icon.
### Building profile
The building profile determines the test cycle used during the release of air. In most cases, this should be set to *Normal* which will trigger a 2-step, 1.5 second burst of air for each step.
For buildings that have been purposely built to a very airtight standard, such as Passivhaus, this can be set to *Very Airtight*. This will trigger a 3-second burst of air for both steps.
### Advanced settings
For advanced use cases, it is possible to override the number of steps and Pulse duration manually, as well as change the barometric pressure reading.
Overriding the default advanced settings can cause unexpected results. This section is designed for expert users only.
## Run test screen
The final stage is to launch the Pulse test. Clicking the *Next* button on the *Settings* screen will take you to the *Run test* screen.
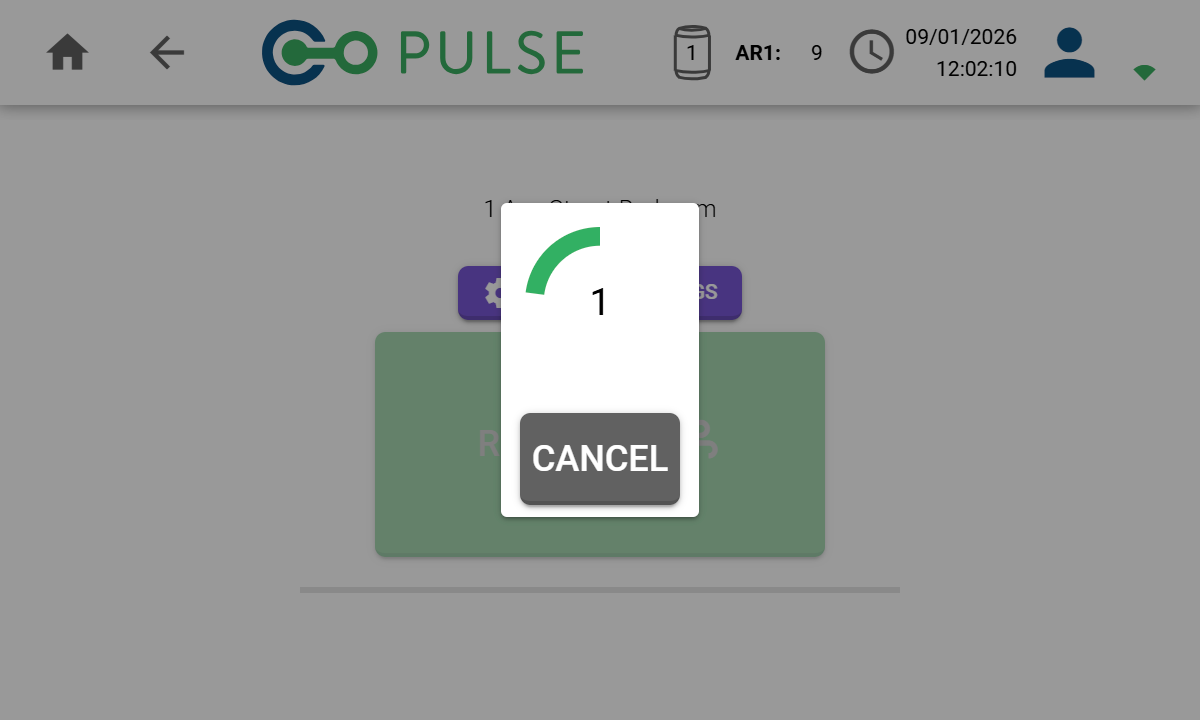
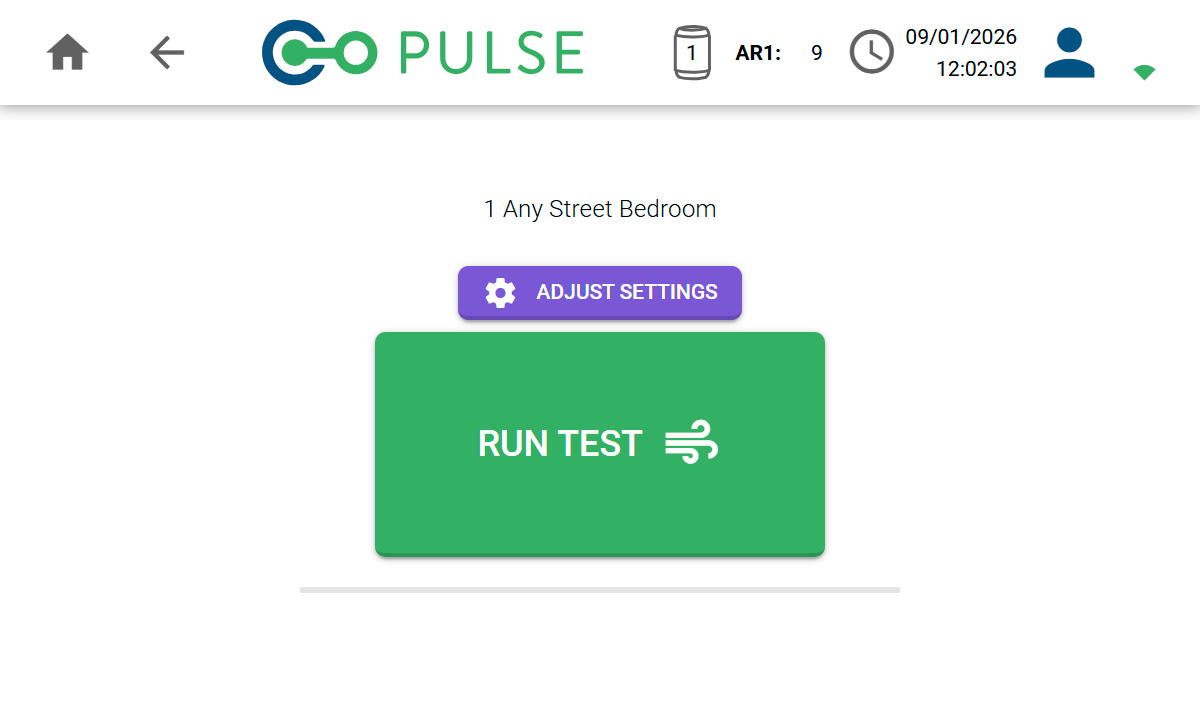 When the button is clicked, you will be given a 5-second countdown timer before the test begins. During this time you should alert others that the test is about to fire and be loud.
It is still possible to cancel the test during the countdown.
When the button is clicked, you will be given a 5-second countdown timer before the test begins. During this time you should alert others that the test is about to fire and be loud.
It is still possible to cancel the test during the countdown.
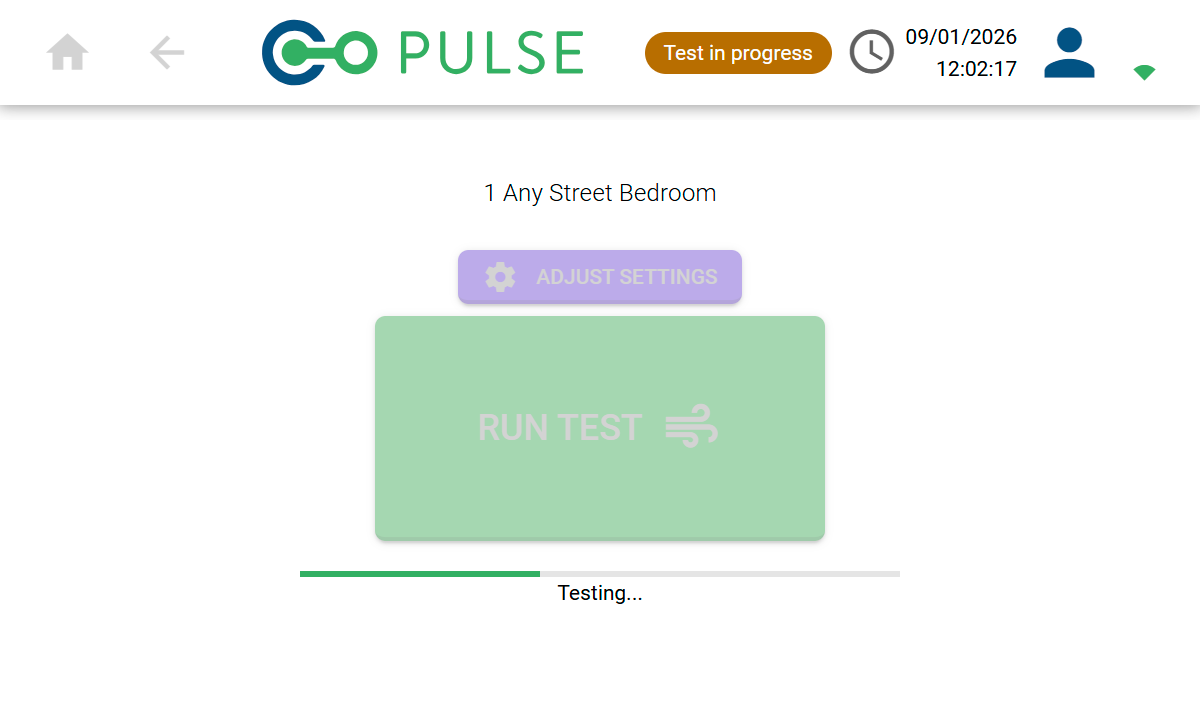
 After the countdown ends, the Pulse test will start by releasing air from the connected air receivers. It is not possible to cancel the test once it is in progress.
Once the test cycle has been completed, the result will be presented on screen.
After the countdown ends, the Pulse test will start by releasing air from the connected air receivers. It is not possible to cancel the test once it is in progress.
Once the test cycle has been completed, the result will be presented on screen.
 Refer to the test cycle for more information on the stages of a Pulse test.
The burst of air released during a Pulse test is loud. Always ensure other people in the building are aware before running a Pulse test.
We recommend that you always wear ear plugs or suitable ear protection due to the loud noise levels.
It is your responsibility to perform a health & safety risk assessment for the site in question before doing a Pulse test.
## Results screen
Once the test has completed, the *Results* screen will be displayed showing the status of the Pulse test and the result for various air leakage metrics at both 4 Pa and 50 Pa.
Refer to the test cycle for more information on the stages of a Pulse test.
The burst of air released during a Pulse test is loud. Always ensure other people in the building are aware before running a Pulse test.
We recommend that you always wear ear plugs or suitable ear protection due to the loud noise levels.
It is your responsibility to perform a health & safety risk assessment for the site in question before doing a Pulse test.
## Results screen
Once the test has completed, the *Results* screen will be displayed showing the status of the Pulse test and the result for various air leakage metrics at both 4 Pa and 50 Pa.
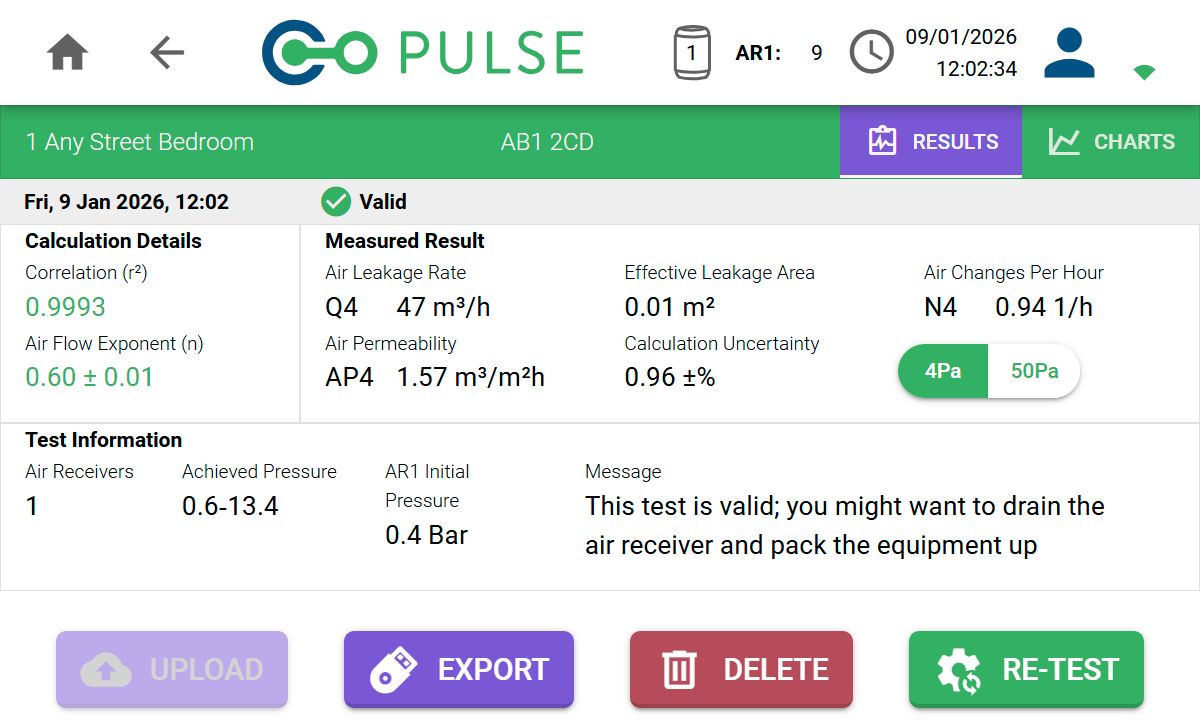 The Pulse test will show one of the following four statuses:
The test completed successfully.
The test completed with warnings, such as low or high building pressurisation.
The test was not valid due to insufficient building pressurisation, but it is still possible to present an "in excess of" result.
The test was not valid and a result cannot be presented with any confidence.
Refer to test validity and result metrics for more information on understanding results and warning messages.
### Uploading the result
If you are connected to Wi-Fi and signed in as an online user, it is possible to upload the result directly to the cloud from the *Results* screen.
Click the *Upload* button and wait for the test to be uploaded to your cloud account.
### Exporting to USB
Alternatively, test results can always be exported to a USB flash drive. To achieve this, plug a USB flash drive into the *USB* port on the top of the controller and click the *Export* button.
This will write a .PAT file to the root folder of the USB flash drive, which can then uploaded to Pules Online using a separate computer.
Only USB flash drives that are formatted using either FAT32, exFAT or VFAT are supported.
### Re-running a test
The *Results* screen also includes a button to perform a re-test. This allows you to quickly re-run the same test again in the case of invalid tests or where you want an average of multiple tests.
The Pulse test will show one of the following four statuses:
The test completed successfully.
The test completed with warnings, such as low or high building pressurisation.
The test was not valid due to insufficient building pressurisation, but it is still possible to present an "in excess of" result.
The test was not valid and a result cannot be presented with any confidence.
Refer to test validity and result metrics for more information on understanding results and warning messages.
### Uploading the result
If you are connected to Wi-Fi and signed in as an online user, it is possible to upload the result directly to the cloud from the *Results* screen.
Click the *Upload* button and wait for the test to be uploaded to your cloud account.
### Exporting to USB
Alternatively, test results can always be exported to a USB flash drive. To achieve this, plug a USB flash drive into the *USB* port on the top of the controller and click the *Export* button.
This will write a .PAT file to the root folder of the USB flash drive, which can then uploaded to Pules Online using a separate computer.
Only USB flash drives that are formatted using either FAT32, exFAT or VFAT are supported.
### Re-running a test
The *Results* screen also includes a button to perform a re-test. This allows you to quickly re-run the same test again in the case of invalid tests or where you want an average of multiple tests.